• Skip to primary navigation
  • Skip to main content
  • Skip to primary sidebar
  • Skip to footer

GeeksPit

News and tips for iPhone, iPad, Mac and Apple Watch

  • Home
  • iPhone
  • iPad
  • Mac
  • Apple Watch
You are here: Home / Archives for Moses Johnson

Moses Johnson

Moses Johnson is the Editorial Director of GeeksPit.com, who has a keen eye for news, rumors, and all the unusual stuff around Apple products. Moses is commonly referred to online as The Professor, with decades of experience in tech under his belt.

Missing Personal Hotspot on iPhone 16 Pro Max? Fix

Last Updated on October 5, 2024 by Moses Johnson

Having Personal Hotspot on your iPhone can come in handy during the time when there’s no Wi-Fi connectivity. In my own experience, there’ve been many times when sharing cellular data through Personal Hotspot has exalted me to a higher ranking among my peers.

Jokes aside, iOS Personal Hotspot is indeed a blessing however, there are times when you find this option to be missing on iPhone 16 Pro Max. Well to help you out of such a situation, here are some simple to advanced and ultimately last resort solutions to fix missing Personal Hotspot issue on iPhone 16 Pro Max. Let’s get started.

Reasons Why the iPhone 16 Pro Max Personal Hotspot Feature Disappears

Normally, using Personal Hotspot is as simple as turning on the feature. However, some users find that their iPhone 16 Pro Personal Hotspot disappears. This often happens after upgrading the OS or after jailbreaking an iPhone.

How to Fix a Missing iPhone Personal Hotspot on iPhone 16 Pro Max

If your iPhone 16 Pro Max Personal Hotspot is missing, try these 10 steps, in this order, to fix the problem.

Toggle cellular data on and off

Personal Hotspot requires a connection to a cellular data network, such as 4G. Turning Cellular Data off and on may bring back a missing Hotspot. Go to Settings > Cellular and then turn Cellular Data toggle off and on.

Check the Personal Hotspot settings

Sometimes when Personal Hotspot is missing from the Settings app, it’s still present in another place. If so, you can get it back through a different path.

  1. Go to Settings > Cellular > Personal Hotspot.
  2. Move the Personal Hotspot toggle to On (green).
  3. Go back to the main Settings screen. If you see Personal Hotspot listed under Cellular, the problem is solved.

Restart your iPhone.

Restarting an iPhone is a simple troubleshooting tip that can bring back missing Hotspot setting. To restart your iPhone 16 Pro Max, hold down the side button and either of the volume buttons at the same time until the Apple logo appears on the screen and then release the buttons. Wait for a few seconds for your iPhone to turn off completely and then press the side button to power it back on.

Update the carrier settings

While it doesn’t happen as frequently as Apple releasing new versions of iOS, every so often, your phone company (also called your carrier) releases new versions of the settings that help your iPhone work on its network. Updating to the latest settings could be the cause of the missing Personal Hotspot on iPhone 16 Pro Max. To check for carrier settings update, connect your iPhone to the Internet and then go to Settings > General > About. If there is an update, you will see a pop-up. Tap Update.

Update to the latest version of iOS

The Personal Hotspot feature not showing on iPhone 16 Pro could be caused by a bug in iOS, the operating system installed on your iPhone. If that’s the case, there may be an iOS update available that fixes the issue. iOS updates are free and easy to install. You can install updates wirelessly by going to Settings > General > Software Update.

Remove APN certificates

This option only affects a small number of users, but it could be the culprit. If you installed any Access Point Name (APN) certificates to make your phone work with certain phone companies, especially ones outside of the U.S., it could cause a Personal Hotspot not to show up.

In that case, delete the APN certificate. Go to Settings > General > Profiles, and tap the profile you want to delete. Then, tap Delete Profile and, in the confirmation pop-up, tap Delete.

If you don’t see Profile listed under the General settings, it means there is nothing to delete. The APN certificates are not the problem.

Change your iPhone’s name

Every iPhone has a name, such as Dave’s iPhone. That name doesn’t get used for much, but it can cause the Personal Hotspot to go missing. If you changed the name of your phone or unlocked your phone, change your phone back to its original name.

  1. Go to Settings > General > About > Name.
  2. Tap the Clear Text button, enter a new name, then tap Done.

Reset the network settings

The missing Personal Hotspot on iPhone 16 Pro Max can be caused by problems with the settings that control the phone’s access to cellular and Wi-Fi networks. Resetting network settings and starting fresh may help solve the problem.

Go to Settings > General > Transfer or Reset iPhone > Reset > Reset Network Settings.

After the reset is finished, you may have to enter Wi-Fi network passwords or pair Bluetooth devices again.

Restore from a backup

If you find iPhone 16 Pro Max personal hotspot missing after trying the above steps, it’s time for a more radical step: restoring from a backup. This erases all the data and settings on the iPhone and replaces the data with an older version. Anything that you don’t back up is lost during this process, so make a backup of your iPhone before beginning this process.

  1. Go to Settings > General > Transfer or Reset iPhone, then tap Erase all Contents and Settings.
  2. Enter your passcode or Apple Account password.
  3. Wait for all content to be safely removed from your phone.

Contact Apple or schedule an appointment at a Genius Bar

If you’ve come this far and the iPhone 16 Pro Max Personal Hotspot feature is still missing, you might be having a hardware problem. At this point, contactApple. You can also visit the nearest Apple Store for further help.
Tags: Personal hotspot

How to fix Apple Pay problems on iPhone in iOS 18

Last Updated on September 26, 2024 by Moses Johnson

This article explains what you can do if Apple Pay stopped working on your iPhone after iOS 18 update.

KEY TAKEAWAYS

  • To fix Apple Pay problems on iOS 18, first make sure the terminal accepts Apple Pay.
  • If it does, try selecting the credit card manually from your Wallet app.
  • Other fixes include replacing your credit card in the Wallet app and signing out and back into your Apple ID.

Apple Pay is a service that lets you make mobile purchases using your existing credit cards. You just need to load your credit cards into the Apple Wallet app on your iPhone. After loading your Apple Wallet app with one or more credit cards, you can use Apple Pay to complete purchases at point-of-sale terminals in many restaurants, grocery stores, and retail stores.

At least when it’s working, Apple Pay makes it possible to make purchases without ever pulling your wallet or credit cards out of your pocket. But sometimes, Apple Pay doesn’t quite work as expected. It could be a really bad and embarrassing experience for you to find out that Apple Pay isn’t working is when you’re at the checkout and especially if you’re the first in a long line of customers.

Sometimes you may get error messages like “Could not connect to Apple Pay” or “An error occurred…”. Sometimes when you attempt to pay with Apple Pay just like you did before to pay, nothing happens this time. Here are 13 ways you can fix Apple Pay when it’s not working on iPhone in iOS 18.

how to fix Apple Pay not working on iPhone in iOS 18

1. Make sure the point-of-sale terminal works with Apple Pay

If you’re unable to use Apple pay in iOS 18, first make sure that the point-of-sale terminal works with Apple Pay. Often, there will be a sign indicating that the terminal accepts Apple Pay.

If you hold your phone near the terminal’s credit card reader and nothing happens, ask the person behind the counter if it supports Apple Pay. They’ve likely been asked many times already and can tell you not just whether it works with Apple Pay, but where the best place to hold your phone is and if another terminal will give you better results.

2. Try choosing a card manually

When Apple Pay and the terminal are working normally, the Apple Pay wallet launches automatically and your default credit card will be selected automatically when you bring the phone near the terminal. But if that’s not working, you may want to select the card manually.

  1. Open the Wallet app on your iPhone.
  2. Tap the card you want to use for the purchase.
  3. If you have multiple cards, touch and hold the card you want to use and drag it to the front of your card stack.
  4. Hold your phone near the terminal’s credit card reader until you see a checkmark appear.

If you do not see your card in the Default Card list, you will need to add it first. If you need to add a card, follow these steps:

  1. Open the Wallet app on your iPhone.
  2. Tap the Add ( ) button in the top-right corner of the screen.
  3. Tap Debit or Credit Card.
  4. Tap Continue, then follow the onscreen instructions. You will need to enter the card details, which you can do manually by entering its numbers and other details, or you can do this automatically by scanning your card

After adding your card, you can now make it the default card.

3. Quit the Wallet app and then reopen it

Apple Pay works in conjunction with the Wallet app. So, if Apple Pay is not working on your iPhone, quit the Wallet app and then reopen it. Here’s how:

  • Go to the Home screen and swipe up (if you have a device with a Home button, double press the Home button), this will reveal the last used app previews.
  • Find the Wallet app (you may swipe left or right to find it).
  • Swipe up on the Wallet app icon to close it.

4. Make sure the Wallet app is allowed to use cellular data

If the Wallet app is not allowed to use cellular data, it will only use Wi-Fi and thus Apple Pay may not work outside of the Wi-Fi range. Here is how you can check if the Wallet app is allowed to use cellular data:

  1. Tap Settings.
  2. Tap Cellular.
  3. Scroll down to find the “cellular data” section. Scroll down further to find Wallet and make sure that it is enabled.

5. Enable Wallet when your phone is locked

Enabling Wallet access when your iPhone is locked is another important setting to ensure Apple Pay works properly. Here is how you can adjust this setting:

  1. Tap Settings.
  2. Tap Face ID & Passcode (or Touch ID & Passcode, depending on your model).
  3. Enter your passcode.
  4. Scroll down and find the “allow access when locked” section and make sure that Wallet is enabled.

6. Make sure that your Region setting is set correctly on your iPhone

Apple Pay is not available everywhere. So, you should make sure that your Region setting is set correctly on your iPhone. Here is how you can check this:

  1. Tap Settings.
  2. Tap General.
  3. Tap Language & Region.
  4. Tap Region.

7. Check Apple Pay’s system status

There may be a temporary issue with the Apple Servers. Sometimes Apple Servers may be having trouble and be down, causing the Apple Pay service to not work. To see the status of Apple Servers, go to the Apple System Status page and see if Apple Pay & Wallet has a green status light. If it doesn’t, the only thing you can do is to wait for Apple to fix it. Meanwhile, you can make a purchase the old fashioned way.

8. Check for the latest iOS update

If Apple Pay is still not working, make sure that your iPhone is running the latest version of iOS 18. Here’s how to update your iPhone:

  1. Tap Settings.
  2. Tap General.
  3. Tap Software Update.
  4. If an update is available, tap Update Now and follow the onscreen instructions.

9. Restart your iPhone

If you’re still unable to use Apple pay, it’s time to restart your iPhone. This can fix minor software problems and give your iPhone a fresh start.

  1. Tap Settings.
  2. Tap General.
  3. Tap Shut Down.
  4. Slide the power off slider.
  5. Press and hold the Side button until you see the Apple logo.

10. Replace your credit card in Apple Pay

If you are still having this problem, you may need to replace your default card because your old card may not be valid anymore. Here’s how:

  1. Tap Settings on your iPhone.
  2. Tap Wallet & Apple Pay.
  3. Tap the card that isn’t working under the Payment Cards section.
  4. Tap Remove This Card. You will need to confirm this choice.
  5. Restart your phone.
  6. Return to the Wallet & Apple Pay section in Settings.
  7. In the Payment Cards section, tap Add Card.
  8. Follow the onscreen instructions to add that same card back again.

11. Sign out and back into your Apple ID

Sometimes signing out of your Apple ID and signing back in again can fix a minor issue with the Apple Pay.

  1. Tap Settings.
  2. Tap your name.
  3. Tap Sign Out. You’ll need to confirm that you want to do this.
  4. Restart your phone.
  5. Return to the Settings app and sign back into your Apple ID.

12. Contact your card issuer

If nothing works, check-in with your bank or financial institution that issued your card. Perhaps Apple Pay did not work because your card is declined because of various reasons such as:

  • Your card may have expired.
  • Your card does not have enough funds available for the transaction.
  • Your card payment is past due.
  • Your card has been flagged for fraud and thus your account was blocked by your bank.

Simply call your card issuer and find out the reason.

13. Contact Apple customer support

You’ve done your due diligence and tried to fix the issue by ruling out the obvious faults listed above, but if Apple Pay is still not working on your iPhone, it’s time to contact Apple support. There may be a more complex issue with your iPhone that only an Apple support employee can address — for example, the NFC chip used to communicate with the point of sale terminal might not be working. You can get help online, over the phone, or through the mail. You can also schedule an appointment if you want to head into your local Apple Store.

FAQs

Which prepaid cards work with Apple Pay?

Apple Pay works with Visa, Mastercard, and American Express prepaid cards. You can also use Apple Pay with some Discover cards.

Where does Apple Pay work?

According to Apple, Apple Pay is accepted by 85 percent of U.S. retailers including Best Buy, GameStop, Walgreens, Costco, and Target. Basically anywhere that accepts contactless payments takes Apple Pay. Even some vending machines, taxis, and subway stations accept Apple Pay.

Why isn’t Apple Pay working in text messages?

The person you’re trying to send money to may not be eligible to accept payments through text messages. Try deleting the conversation and starting a new one, unlink and relink your card, then restart the Apple Pay and Messages apps. If you still have trouble, update iOS and restart your device.

Tags: Apple Pay

How to fix Apple CarPlay not working on iPhone after iOS 18 update

Last Updated on September 27, 2024 by Moses Johnson

A lot of iPhone users are facing problems with Apple CarPlay after iOS 18 update. Some users have reported that they’re not able to connect their iPhone to CarPlay. Other users have complained that CarPlay suddenly stopped working or keeps disconnecting after it is connected. Other users have stated that their iPhone is not detected by CarPlay. Others have said that CarPlay keeps freezing and they sometimes see a black screen. And lastly, some users have reported that they’re having CarPlay sound problem.

Apple CarPlay lets you interact with your phone via voice commands or your vehicle’s on-screen infotainment system to do things like dictate text messages, get turn-by-turn directions, make phone calls, and more. If CarPlay is not working on iOS 18, please try the troubleshooting steps below. After each step, try using CarPlay again.

How to fix CarPlay not working on iPhone in iOS 18

Make sure your country, stereo, or car support Apple CarPlay

Let’s start with the basics. Not all cars, or stereos support Apple CarPlay. There are also location restrictions, so you won’t be able to use Apple CarPlay from unsupported countries.

Apple CarPlay is not available in all countries. You can find the complete list of supported countries here

You’ll also need a supported car. You can check the full list of compatible vehicles on the Apple website.

The following third-party stereos are also compatible with Apple CarPlay:

  • JVC
  • Kenwood
  • Pioneer
  • Alpine
  • Blaupunkt
  • Clarion
  • Sony

Make sure CarPlay is enabled on your iPhone

After you’ve checked CarPlay compatibility, make sure that CarPlay is properly configured on your iPhone. Whether this is the first time you are using it or the thousandth, it’s possible that the feature somehow got turned off by accident.

  1. Open the Settings app.
  2. Go into General.
  3. Tap CarPlay.
  4. Look for your car in the My Cars section. If you don’t see it, press and hold the voice command button on your steering wheel to start setup and pair the car with your phone.

Make sure CarPlay is not restricted

If CarPlay is paired properly but it’s still not working, make sure it isn’t disabled in Screen Time.

  1. Open the Settings app.
  2. Go into Screen Time.
  3. Tap Content & Privacy Restrictions.
  4. Tap Allowed Apps.
  5. Make sure that CarPlay is enabled.

Enable CarPlay when your phone is locked

If CarPlay isn’t enabled when locked, it can’t activate if your phone screen is turned off. Here’s what to do:

  1. Open the Settings app.
  2. Go into General.
  3. Tap CarPlay.
  4. Tap your car in the list of connected automobiles.
  5. Make sure Allow CarPlay While Locked is turned on by swiping the button to the right.

Ensure Siri is enabled

Siri needs to be enabled for CarPlay to work. If you are having iOS 18 CarPlay issues, it’s possible Siri is disabled. You might have turned it off and forgotten to turn it back on, for example. It’s easy to check and re-enable if needed.

  1. Open the Settings app.
  2. Go into Siri.
  3. At the top of the screen, make sure the following options are enabled:
    • Talk to Siri, “Siri” or "Hey Siri”
    • Press Side Button for Siri or Press Home For Siri
    • Allow Siri When Locked

Restart

When CarPlay isn’t working after iOS update, this can be due to a temporary glitch. You can often resolve a software glitch with your iPhone, car’s infotainment system and car simply by turning them off and then back on again.

  • To restart iPhone XR, 11, 12, 13, 14 or 15: Press and hold the Side and volume up (or down) buttons together until you see the power off slider. Drag the slider to turn it off. Then press and hold the Side button until your iPhone starts.
  • To restart iPhone SE (2nd and 3rd generations): Press and hold the power button until the power off slider appears. Slide the slider. Then press and hold the power button until the Apple logo appears.

You can also restart your car’s infotainment system. This is different for different cars and models. For example, you may need to press and hold down the audio system power knob for at least 10 seconds. Again this may be different for your car. Simply check your car’s manual.

Double-check your USB cable and ports

If wired CarPlay is not working, check the following:

  • If you’re using the original iPhone USB cable, check it to ensure none of the wires are frayed or broken.
  • If you’re using an aftermarket cable, make sure that the cable is Apple certified.
  • If possible, try a different USB port to connect.
  • If possible, try a different USB cable.
  • Make sure that your USB cable is connected properly.
  • Make sure that your charging port and the USB port are clean and there are no damages.

Check for the latest updates

Make sure that both your iPhone and your car are running the latest version of their software. You can update iOS software on your iPhone wirelessly. Here is how:

  1. Open the Settings app.
  2. Go into General.
  3. Tap Software Update.
  4. If an update is available, tap Update now and follow the onscreen instructions.

Check your automobile’s user guide to see how to check for firmware updates.

Wireless CarPlay not working? Make sure both Bluetooth and WiFi are enabled

If wireless CarPlay is not working, there are a few additional checks to make sure your iPhone is ready to work with wireless CarPlay.

  • Make sure Airplane mode is disabled on your iPhone (Settings > Airplane Mode).
  • Make sure that Bluetooth is enabled on your iPhone (Settings > Bluetooth).
  • Make sure that Wi-Fi is enabled on your iPhone (Settings > Wi-Fi).

Reconnect CarPlay

If you are still having your problem, try to reconnect CarPlay. Here is how:

  1. Open the Settings app.
  2. Go into General.
  3. Tap CarPlay.
  4. Select your car.
  5. Tap Forget This Car.

Now you will need to set up again. Here is how:

Depending on your car:

  • Simply plug your iPhone into the USB port in your car, then press and hold the voice command button on your steering wheel to start the setup process.
  • Or if your car supports wireless CarPlay, go to Settings > General > CarPlay, tap Available cars, and then select your car.

CarPlay still not working?

If CarPlay is still not working, this may mean that there is an issue with your car’s stereos system. You can also contact Apple Support for further help.

Tags: CarPlay

How to check if iPhone 14 Plus is genuine or fake

Last Updated on January 20, 2024 by Moses Johnson

Fake iPhones are widespread. We explain how to identify a fake iPhone 14 Plus and make sure you’re buying the real thing

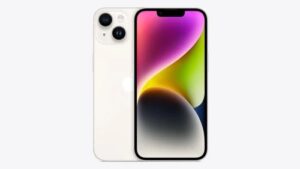
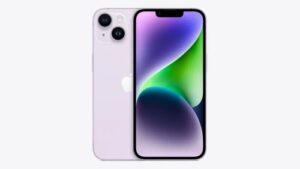
iPhone 14 and iPhone 14 Plus in Purple

How can I tell if an iPhone 14 Plus is fake? I don’t want to spend money on a counterfeit phone that won’t work properly.

There are lots of telltale signs that any product has not been made by Apple, and the iPhone 14 Plus – which has seen more than its fair share of fakes – is no exception.

QUICK ANSWER

  • The best way to tell if your iPhone 14 Plus is fake is by entering it’s serial number into Apple’s "Check Coverage" website.
  • This website will tell you if the iPhone is registered in Apple’s system, which all real iPhones are.
  • You should also look for typos on the packaging and check if the phone is running iOS.

Did you find a deal on an iPhone 14 Plus that feels too good to be true? Chances are it probably is—you can find fake iPhone 14 Plus all over the internet. Unfortunately, scammers are getting better at manufacturing, marketing, listing, and selling these fake iPhones, making it more challenging to find an authentic product.

However, counterfeit iPhone 14 Plus have a few tell-tale signs that you can look for. Below, we’ll walk you through how to spot a fake iPhone 14 Plus. And if you discover your brand-new iPhone 14 Plus isn’t legit, we have tips and best practices to resolve the issue.

The first clue the iPhone 14 Plus is fake is that it costs

Obviously, price is the biggest clue. If it seems too good to be true, it probably is.

The base price for the iPhone 14 Plus is $899 (£949 / AU$1,579), which gets you 128GB storage.

The 256GB version of the iPhone 14 Plus costs $999 (£1,059.00 / AU$1,749) and the 512GB model will cost you $1,199 ( £1,279.00 / AU$2,099).

Take a good look at the box

One of the best ways to recognize a fake iPhone 14 Plus is by looking at its packaging. This is obviously easier to do in person, but you can also ask for close-up pictures. Apple, like other tech companies, takes great pride in its presentation. There will be no spelling or grammar errors with a legitimate iPhone 14 Plus box, nor will there be imperfections like pixellated or distorted images.

With its hinged lid, the fake iPhone 14 Plus box is easy to open. The top of the real iPhone 14 Plus box, on the other hand, must be shaken and wiggled free from the bottom half — a task that must be done fairly carefully when you’re dealing with $1000-plus of easily broken glass and electronics.

Make sure what’s inside the box is supposed to be there

Again, Apple’s packaging is uniform. Each product will feature the same exact packaging from box to box, with no deviations. iPhone 14 Plus is supposed to come with a Lighting to USB-C cable, and some documentation. If something is off — the Lightning cable is USB-A rather than USB-C, say — you know you have a fake.

Check Physical Details

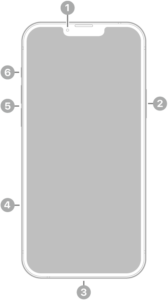
The front view of iPhone 14 Plus. The front camera is at the top center. The side button is on the right side. The Lightning connector is on the bottom. On the left side, from bottom to top, are the SIM tray, the volume buttons, and the ring/silent switch.  

Let’s assume you’ve got the possibly fake iPhone 14 Plus in your hand. Here are several things to check before you hand over the money. We can’t be certain it’s legitimate – it could just be a fantastic counterfeit – but these will rule out 95 percent of fakes.

Wrong material

The real iPhone 14 Plus has an aluminum body with matte-finish sides and a glossy glass back. In general, the handset feels cool, smooth, and solid. Fake iPhone 14 Plus have pconstruction that feels cheap.

Wrong size

The official dimensions of the iPhone 14 Plus, as detailed on Apple website, are:

  • Width: 78.1 mm (3.07 inches)
  • Height: 160.8 mm (6.33 inches)
  • Depth: 7.80 mm (0.31 inch).

This might seem like a simple detail for a counterfeiter to get right, but you’d be surprised: many fakes are thicker than the real thing, because it’s so hard to match Apple’s engineering capabilities.

If you’ve got scales, check the weight too. The iPhone 14 Plus weighs 203 grams (7.16 ounces. A fake iPhone 14 Plus may not quite as heavy as the real thing.

Check the controls

Fake iPhone 14 Plus often have weaker construction and a somewhat different design from genuine versions. As a result, you must thoroughly examine the iPhone’s outside. Here are some things you should look out for:

  • At the top of the iPhone 14 Plus are a front-facing built-in stereo speaker and microphone.
  • On the top left of the phone is the Ring/Silent switch.
  • Below the Ring/Silent switch are the iPhone Volume buttons.
  • Below the volume buttons you’ll see a tiny hole. This is the SIM tray (available on models purchased outside the U.S.)
  • On the right is the iPhone Side button.
  • Finally, between the built-in bottom microphones and stereo speaker, is the Lightning connector port.

Your iPhone 14 Plus is probably a fake if any of these controls are missing or positioned in an unexpected location.

Check the back of the phone

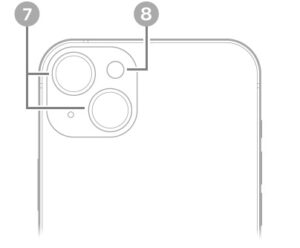
The back view of iPhone 14 Plus. The rear cameras and flash are at the top left.  

On the back of your iPhone, you should see two cameras. The tiny hole is the microphone, just like near the front camera. There is also a small textured circle; this is the camera’s flash. Check these are present, and also that they work.

There should also be an Apple Logo in the middle of the phone rear. Fake Apple iPhone 14 Plus may have differently positioned logo, or no logo at all.

Check the color

The color of the phone can also signal to you whether it’s fake or genuine. The iPhone 14 Plus colors are Midnight, Starlight, Blue, Purple, Red and Yellow. If you see iPhone 14 Plus in any other color than these: it’s fake, so don’t buy it.

Power on the phone and try it out

Fakes are most easily identified by their inability to replicate the interface and general user experience of a genuine iPhone 14 Plus. Start it up and swipe through a few screens and apps: the touchscreen should respond near-instantaneously to your swipes.

Try to invoke Siri by pressing on the Side button; if she doesn’t answer, it’s either a defective iPhone or a fake. Next, check out the icons on the home screen: For example, if you see a Google Play app, it’s not an iPhone. Or try tapping the App Store icon; if doesn’t go to Apple’s App Store, it’s not an iPhone.

Verify the serial number

Apple runs a website that lets users check if their products are still under warranty. This is great for checking real products, of course, but it also has the added benefit of telling you when you’re using a fake product.

To use the site, you’ll just need your iPhone’s serial number. To find your iPhone’s serial number, open the Settings app and go to General > About. Here, you’ll find the serial number of your iPhone. Now, long-press on the serial number and tap Copy.

Once you copy the iPhone’s serial number, head to the Check Coverage website and enter it into the field at the top, then fill out the CAPTCHA and click Continue. Then, wait a few seconds for Apple to pull up the record for your iPhone from its database.

See the model and purchase date displayed on the screen and compare them to yours. If both credentials are accurate, your iPhone is genuine. However, if Apple says it has no information for a device with this serial number, it’s probably a counterfeit. This is how you can tell if your phone is an authentic iPhone 14 Plus or a counterfeit one.

Already bought a counterfeit or fake iPhone 14 Plus? What now?

It’s not always possible to check iPhone’s legitimacy with online sellers. Still, even if you end up with a dud handset, it’s not necessarily the end of the road. So, what should you do once you have identified your new iPhone 14 Plus is fake? If the online shop or Ebay seller is still active, a return or refund should be attempted. Usually sellers can be persuaded to reimburse the purchase price, although if some time has passed before you recognised the counterfeit nature of the product it may be a little more difficult.

To return an item for a refund on Ebay you should follow these steps:

  • Find the item in your Purchase history.
  • Select Return this item.
  • Give your reason for the return. You can add images to back up your claim.

If you purchased the fake iPhone 14 Plus from somewhere else a similar attempt should be made to return them for a refund. Your payment method can offer a level of protection.

Try to avoid paying in cash due to the lack of a paper trail and the inability to recover payment. Credit cards are better than debit, cash cards, or bank transfers in this regard too. Your bank can usually dispute a transaction to obtain a chargeback. Always check your specific bank’s terms and conditions and you may have to send in a dispute form to initiate the process. PayPal also offers inclusive buyer protection when buying through them, specifically covering knock-off goods and used products.

Most digital means of payment offer some protection against fraudulent merchants.
We’d also recommend trying to obtain proof of purchase and a detailed item description from the seller to act as evidence, just in case. It’s also a good idea to familiarize yourself with the seller’s reputation online via reviews and forum posts before committing to a purchase. A quick Google search ahead of time might save you lots of agony after the fact.

With all of the above in mind, you’re now well prepared and protected against ending up with a fake iPhone 14 Plus. The chances of encountering one are slim, but it’s always best to be prepared.

How to tell if your Apple iPhone 14 screen is original or fake

Last Updated on December 23, 2023 by Moses Johnson

If you are currently using an iPhone 14 that wasn’t purchased from Apple, you may be using a screen that is not genuine without realizing it. The good news is that there are a few ways to check if your iPhone 14 display is original or not. We’ll explore them below.

iPhone 14 and iPhone 14 Plus in Starlight

Note: information in this article apply to iPhone 14, iPhone 14 Plus, iPhone 14 Pro and iPhone 14 Pro Max.

QUICK ANSWER

To check if iPhone 14 screem is original, go to Settings > General > About and look for the ”Parts and Service History” section beneath the device’s serial number. If the section is missing, the iPhone 14 screen is original.

What Can Go Wrong With Non-Genuine iPhone 14 Screen?

Non-genuine screen replacements can lead to issues with several iPhone features, especially Multi-Touch and Face ID. These issues can include poor touch detection, unresponsive tapping, and even phantom tapping.

While minor inconveniences, like brightness, are easy to overlook if you’re hoping to save money, non-genuine iPhone parts can also cause more alarming issues. Display issues can also cause damage to other parts of the phone, resulting in degraded ambient light sensors, incorrect color calibration, and faster battery drain.

How to check if an iPhone 14 screen is original or fake

Check Parts and service history

Parts and Service History details the repair history of the most commonly serviced modules on an iPhone. These parts include the battery, camera, and display, all of which are most vulnerable to damage and wear and tear.

The feature aims to provide details on whether the mentioned parts in your iPhone have either been replaced or aren’t functioning properly.

If your iPhone 14 screen has been replaced, Parts and Service History will show you whether the repair center used genuine Apple parts.

To check if iPhone 14 screen has been changed, simply follow the steps below:

  1. Open the Settings app.
  2. Tap General.
  3. Tap About.
  4. Look for Parts and Service History.

Please note: The Parts and Service History section will only be available if repairs have been conducted on your ‌iPhone‌.

If a fix was done with genuine Apple parts and tools, repairs in this section will have a "Genuine Apple Part" listing next to the repaired component.

An "Unknown Part" message will be displayed if the screen installation is incomplete, the screen was replaced with a non-genuine display, the screen was already used or installed in another ‌iPhone‌, or if the screen is not functioning as expected.

Enable Maximum Brightness

One way to test if your iPhone 14 display is genuine or not is to put it on maximum brightness and then open a black picture. You can also zoom in on the image to make sure the whole screen is black. If the screen looks like it’s not even turned on, you have a genuine OLED display. On the other hand, if you notice even the slightest bit of gray or white, this indicates the display is not genuine.

Shine a Torch or Flashlight on the Screen

Another method to check if your iPhone 14 screen is original is to shine a torch or a flashlight on your phone’s screen. Then take a close look at the light’s reflection on the screen. An original iPhone 14 display doesn’t have any gridline running through it. On the other hand, a non-genuine screen will have visible gridlines running through it.

Other Telltale Signs Your iPhone 14 Display Is Not Genuine

Multi-Touch issues

  • Multi-Touch is unresponsive on certain screen areas.
  • Degraded Multi-Touch performance, such as missed screen touches or touches not registering in the right location
  • During phone calls, the phone might register accidental touches and the display might remain on.
  • Accidental edge or palm touches might register

Display brightness and color issues

  • True Tone display doesn’t function correctly
  • Lost or degraded function of the ambient light sensor, causing the screen to dim or brighten incorrectly
  • Incorrect display color calibration, such as the display to appearing too yellow or blue
  • Display isn’t uniformly bright
  • Lower maximum brightness
  • Unintentional battery drain

How to tell if your Apple iPhone 14 battery is original or fake

Last Updated on December 23, 2023 by Moses Johnson

When buying a second-hand iPhone or getting an unofficial repair, you run the risk of getting fake battery in your iPhone. Here’s how to check if your iPhone 14 battery is original or fake.

iPhone 14 and iPhone 14 Plus in Starlight

Note: information in this article apply to iPhone 14, iPhone 14 Plus, iPhone 14 Pro and iPhone 14 Pro Max.

While a second-hand iPhones can come with a few defects, it’s best to buy devices that still have their original battery. Original iPhone battery is designed not just to work, but also to pass the necessary safety requirements for everyday use.

Genuine Apple parts are generally more expensive for a reason. They’re built to a higher standard than cheaper alternatives which third-party technicians may opt for to save money. This can lead to them not lasting as long, particularly when it comes to battery replacements.

With an original iPhone, your second-hand device can still be covered by Apple’s warranty for repairs or factory defect recalls. Here are some methods to find out if your iPhone 14 still has it’s original battery.

QUICK ANSWER

To check if iPhone 14 battery is original, go to Settings > General > About and look for the ”Parts and Service History” section beneath the device’s serial number. If the section is missing, the iPhone 14 battery is original.

What Can Go Wrong With Non-Genuine iPhone 14 Battery?

Using a fake iPhone 14 battery could lead to insufficient battery capacity, improper fit, or performance issues. Nongenuine battery might also result in unexpected behavior after installation, device software updates, or while charging. Using nongenuine batteries might also lead to safety issues.

OK, with that out of the way, here’s how to tell if a iPhone 14 battery is original or fake.

How to tell if a iPhone 14 battery is original or fake

Check parts and service history of your iPhone

The Parts and Service History feature can tell you whether your iPhone 14 battery has ever been replaced. If it has, it will tell whether the repair center used genuinebattery.

Here’s how to check your iPhone’s parts and service history:

  1. Launch the Settings app.
  2. Go into General > About.
  3. Look for Parts and Service History.

Don’t panic if you can’t find the Parts and Service History section. The option will only be available when either the battery, display, or camera isn’t functioning as expected or has been replaced.

You will see different messages in the Parts and Service History section.

An Unknown Part will appear if the battery installation is incomplete or if the battery:

  • Was replaced with a nongenuine battery
  • Was already used or installed in another iPhone
  • Isn’t functioning as expected

For display and battery, an additional message might appear that says "Apple has updated the device information for this iPhone." This means that Apple has updated the device information maintained for this iPhone for service needs, safety analysis, and to improve future products.

Sure, warning messages won’t affect how you use your iPhone or your battery, but you should always use genuine battery.

Open the Battery Health Settings

It’s totally normal for your iPhone 14 battery health to degrade with time and use. However, poor battery life can also be a sign that your phone has been tampered with.

Battery health declining at an unusual rate can sometimes be an indication that your iPhone is working harder to compensate for non-genuine parts. Fake parts often work at a level that may be usable, but not sustainable in the long term for your iPhone.

In 2021, Apple released an update that allowed all iPhone models released from 2018 onwards to show an alert for non-genuine batteries.

The alert reads, “Unable to verify this iPhone has a genuine Apple battery. Health information not available for this battery.”

Once Apple has identified non-genuine battery, it will keep the warning on your Lock Screen for four days and in Settings for 15 days. You can also check Settings > Battery > Battery Health & Charging at any time.

How to tell if your Apple iPhone 14 Camera is genuine or fake

Last Updated on December 23, 2023 by Moses Johnson

In this article, I’ll explain how to check if your iPhone 14 Camera has been repaired, and whether or not it has genuine Camera in it.

Note: information in this article apply to iPhone 14, iPhone 14 Plus, iPhone 14 Pro and iPhone 14 Pro Max.

iPhone 14 and iPhone 14 Plus in Purple

QUICK ANSWER

To check if your iPhone 14 Camera is original, head to Settings > General > About and look for the ”Parts and Service History” section beneath the device’s serial number. If the section is missing, your iPHONE 14 camera is genuine.

Problems With Non-Genuine iPhone 14 Camera

According to Apple, your iPhone may exhibit the following issues if it’s camera is not genuine:

  • The camera does not focus correctly or images are not sharp
  • When using Portrait mode, the subject might not be in focus or only partially in focus
  • A third-party app that uses the camera might freeze or quit unexpectedly
  • Real-time preview in third-party apps might appear blank or might get stuck

How to check if the iPhone 14 Camera is original or fake

Check Parts and service history

Like a car, your iPhone now effectively has a logbook of any parts that have been replaced. This area will only show up on a device that has had any components replaced, which means if you don’t see it then you can be relatively sure that the iPhone has remained sealed since it left the factory.

Head to Settings > General > About and look for the parts and service history of your iPhone. Here, youlbe able to see if the camera has been replaced. If the repair was done using genuine Apple parts and processes, you will see ”Genuine Apple Part” next to Camera.

You will see an Unknown Part message if the camera installation is incomplete or if the iPhone 14 camera:

  • Was replaced with a non-genuine camera
  • Was already used or installed in another iPhone
  • Isn’t functioning as expected

We should underscore that this warning does not impede your use of the iPhone despite sounding a bit scary. It exists purely to inform the user that the camera in their iPhone is an aftermarket component rather than a genuine Apple part.

Who Should Replace iPhone 14 Camera?

Aside from Apple itself, certified technicians include authorized service providers and independent repair providers using genuine Apple parts. Authorized technicians have completed Apple’s service training and use the company’s genuine parts and tools.

Camera replacement not performed by Apple, or its authorized service providers, or certified technicians might not follow proper safety and repair procedures and could result in improper function or issues with image quality or overall iPhone safety.

For example, aftermarket iPhone 14 camera parts may not fit precisely within the device. Apple also warns that repairs that don’t properly replace screws or cowlings might leave behind loose parts that could damage the battery, cause overheating, or result in injury.

How to Get Your iPhone 14 Camera Serviced

If one of the cameras in your iPhone 14 is not working properly, and you don’t want to have it serviced using aftermarket components, you can get it replaced:

  • At an Apple Store
  • At an Apple Authorized Service Provider
  • By mailing it to an Apple Repair Center

As for out-of-warranty camera replacements, Apple’s independent repair providers will also offer genuine parts by trained technicians.

Primary Sidebar

Trending

iPhone 14 Pro Max

How to restart, force restart, or reset any iPhone model

The iPhone 15 Pro and iPhone 15 Pro Max in the natural titanium finish.

Is your iPhone slow after iOS 18 update? Try these fixes

A row of iPhone 15 devices show the lineup’s new colors: black, blue, green, yellow, and pink.

iOS 18 draining your iPhone battery? Try these fixes

An iPhone overheating with flames coming out of it.  

iPhone overheating after iOS 18 update? Try these 12 tips

iPhone 14 and iPhone 14 Plus in Starlight

How to update iOS software on your iPhone

Footer

Browse by categories

  • Home
  • How to
  • Tips and Tricks
  • Guides
  • Not Working
  • News

Contact info

  • About Us
  • Contact Us

Legal

  • Terms of use
  • Privacy Policy

Search GeeksPit

Disclaimer

Reproduction of materials found on this site, in any form, without explicit permission is prohibited.

© 2024 GeeksPit Media, LLC. All Rights Reserved.